
Nothing says summer like the gooey, chocolatey joy of s’mores around a campfire.
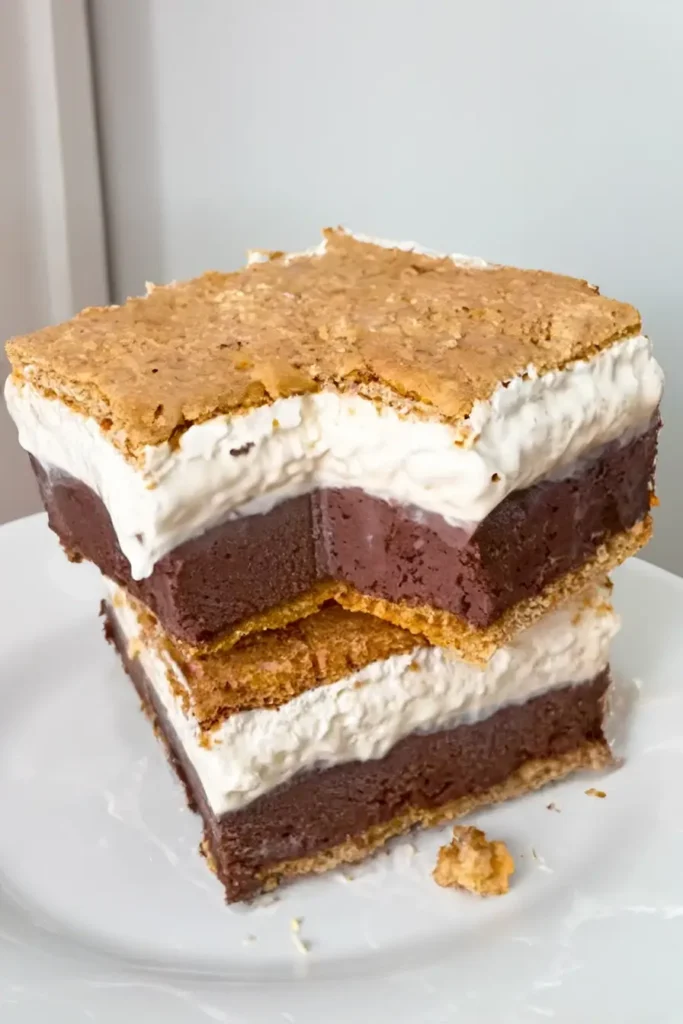
But when the days get hot, I love making Frozen S’mores instead, perfectly chilled, with layers of S’mores ice cream, graham crackers, and chocolate marshmallow goodness.
This no-bake dessert is a refreshing twist on the campfire favorite, ideal for those backyard gatherings or just a cozy treat on the porch with family.
The best part? These decadent frozen treats bring all the flavors we know and love but without the sticky fingers and flames!
If you’re after a sweet, creamy escape to summertime bliss, Frozen S’mores might just become your new favorite chilled snack.

Why You’ll Love This Frozen S’mores Recipe
This Frozen S’mores recipe delivers everything you adore about the original treat, but as a no-bake dessert that’s easy and quick to whip up.
One of my favorite things about these frozen s’mores is how simple they are to make. You don’t need any special equipment, just a freezer and a little bit of time to let the layers chill.
It’s also a recipe that’s fun to personalize! Add extra chocolate, sprinkle a few mini marshmallows on top, or switch up the graham crackers for a twist.
Whether you’re hosting a backyard barbecue or looking for a fun way to enjoy a chilled summertime snack with the kids, Frozen S’mores are a guaranteed hit. With each creamy bite, you’ll be reminded of everything you love about summer!
Loved these easy Frozen S’mores? You won’t want to miss our Easy Homemade Gingerbread Cookies and Easy Overnight Oats Recipe, perfect treats for every season!
Ingredients for Frozen S’mores
Here’s everything you’ll need to make these delicious Frozen S’mores. Each ingredient is a little piece of that classic s’mores magic, brought to life in a creamy, chilled dessert.
- Graham Crackers – The base of this dessert! Look for honey graham crackers for a touch of sweetness, but feel free to use chocolate graham crackers if you’re a big chocolate fan. Gluten-free options also work well here.
- Marshmallow Creme – For that soft, fluffy marshmallow layer, marshmallow creme or fluff is ideal. If you don’t have it on hand, try melting mini marshmallows with a bit of butter for a homemade marshmallow layer.
- Chocolate Pudding Mix – This adds a smooth chocolatey layer that’s quick and easy. You can use an instant chocolate pudding mix or a homemade chocolate pudding if you prefer. Dark chocolate pudding adds a richer flavor if you like a bolder chocolate taste.
- Milk – Needed to mix with the pudding. Whole milk creates the creamiest texture, but 2% or even a non-dairy option like almond milk can work. Just know the pudding might be a bit softer with lighter or plant-based milk.
- Whipped Topping – Whipped topping makes the layers light and fluffy. If you prefer homemade whipped cream, that’s a great swap, though it might make the bars a bit richer. Coconut whipped cream is a tasty dairy-free alternative!
Each ingredient brings its own touch of s’mores nostalgia, so feel free to mix and match based on your family’s favorites or what you have on hand.
How to Make These Frozen S’mores
This recipe is straightforward and perfect for making with the kids or just a fun treat for yourself! Each layer comes together with simple ingredients, and after a few hours in the freezer, you’ll have a decadent, chilled dessert to enjoy.
Here’s how to put together these delicious Frozen S’mores step by step.
- Prepare the Pan – Line an 8×8-inch baking pan with parchment paper, leaving a bit of overhang on the sides so you can easily lift the bars out once frozen. This little trick makes slicing and serving so much easier.
- Make the Chocolate Pudding Layer – In a medium bowl, whisk the chocolate pudding mix with cold milk until smooth and thickened (about 2 minutes). Let it set for a few minutes, then gently fold in half of the whipped topping until the mixture is light and creamy.
- Layer the Graham Crackers – Arrange a single layer of graham crackers at the bottom of the pan, breaking some as needed to fit and create a full layer.
- Spread the Chocolate Layer – Pour the chocolate pudding mixture over the graham cracker layer, spreading it evenly to cover all the crackers. This forms the chocolate base for our chilled summertime snack!
- Add the Marshmallow Creme – Carefully spread the marshmallow creme over the chocolate layer. It can be sticky, so use a slightly damp spoon or spatula to help smooth it out.
- Top with More Graham Crackers – Add a final layer of graham crackers over the marshmallow creme, pressing gently so everything stays nicely packed.
- Finish with Whipped Topping – Spread the remaining whipped topping over the top graham cracker layer, making sure it’s smooth and covers the entire surface. This whipped layer adds a creamy finish to your no-bake dessert.
- Freeze – Cover the pan with foil and place it in the freezer for at least 4 hours or overnight. You want the layers to be fully set for easy slicing.
- Serve – When you’re ready to enjoy, lift the bars out using the parchment overhang and slice them into squares.
These Frozen S’mores are best enjoyed right out of the freezer on a warm day!
Each bite brings that classic s’mores flavor in a whole new way, chilled to perfection. Perfect for a summer treat without the campfire!
Craving more of these Frozen S’mores magic? Grab the full printable recipe just below to keep it handy!
Tips for Making the Best Frozen S’mores
These simple tricks will help you get that perfect, creamy texture in each layer.
First, freeze your Frozen S’mores for at least 4 hours, so the layers set firmly. If you’re making them ahead, they’re even better when left overnight.
To keep the marshmallow layer easy to spread, try slightly warming your spoon or spatula. It’s also helpful to break the graham crackers as needed to create an even layer.
When cutting, use a sharp knife and wipe it between slices for clean, photo-ready squares.
Print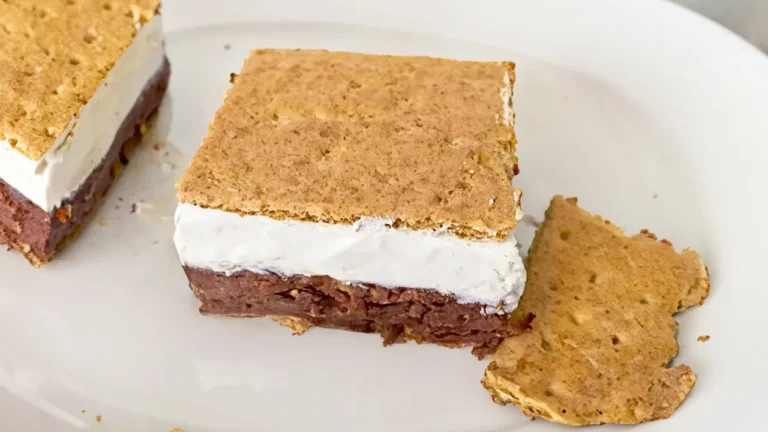
My Easy Frozen S’mores Recipe
Enjoy your Frozen S’mores, a cool and creamy treat for any occasion! Perfect for a hot summer day or any time you’re craving a no-bake dessert.
- Total Time: Freezing Time: 4 hours
- Yield: 12
Ingredients
- 1 box graham crackers
- 1 package chocolate pudding mix
- 2 cups cold milk
- 1 jar marshmallow fluff
- 2 cups whipped topping
Instructions
- Line an 8×8-inch pan with parchment paper.
- Mix chocolate pudding with cold milk and fold in half of the whipped topping.
- Layer graham crackers in the pan and spread the pudding mixture over it.
- Spread marshmallow fluff on top and add another layer of graham crackers.
- Top with the remaining whipped topping.
- Freeze for at least 4 hours, or overnight for best results.
- Slice and serve chilled!
Notes
- You can substitute the whipped topping with homemade whipped cream for a more natural touch.
- If you prefer a thicker marshmallow layer, use more fluff or add a layer of mini marshmallows for extra texture.
- To make this treat even more fun, top with chocolate chips or crushed nuts before serving.
- Prep Time: 15 minutes
Can marshmallow fluff be frozen?
Yes, marshmallow fluff can be frozen! It keeps its texture surprisingly well when chilled, making it perfect for no-bake desserts like Frozen S’mores.
Just know that once it’s thawed, it may not be as spreadable, so it’s best to use it in recipes you’ll serve directly from the freezer.
Are cold s’mores good?
Absolutely! Cold s’mores offer that classic, sweet flavor in a refreshing, creamy form that’s perfect for hot weather.
A chilled s’mores treat like these Frozen S’mores delivers all the goodness of marshmallow, chocolate, and graham crackers with a cool twist that’s perfect for summer.
What do you put on a s’mores bar?
A s’mores bar is all about variety! Start with the basics—graham crackers, marshmallows, and chocolate bars.
Then, add some fun extras like peanut butter cups, caramel squares, cookies, or white chocolate. Fresh fruit, like sliced strawberries or bananas, also brings a delicious twist to the classic chocolate marshmallow treat everyone loves.
Serving Suggestions
For a true summertime treat, serve these Frozen S’mores with iced lemonade or root beer floats—our family loves that pairing!
They’re also fun for backyard gatherings or as a cool surprise after a barbecue. If you’re feeling fancy, add a drizzle of melted chocolate or a sprinkle of crushed nuts on top before serving.
It’s a crowd-pleaser that’s simple, sweet, and perfect for any casual get-together!
You can also swirl some peanut butter into the pudding mix for an even richer taste. For additional inspiration, explore no-bake dessert ideas.