When you’re trying to Make Chicken Cutlets Without Breading Falling Off, nothing is more frustrating than watching the breading fall off during cooking. This common issue can turn your crispy, delicious dinner into a disappointing experience.
But don’t worry—with the right techniques and a little understanding of the process, you can keep your breading intact every time.
In this guide, we’ll explore how to make chicken cutlets without the breading falling off, ensuring you get that perfect golden crust every time.
Make Chicken Cutlets Without Breading Falling Off
What is Breading?
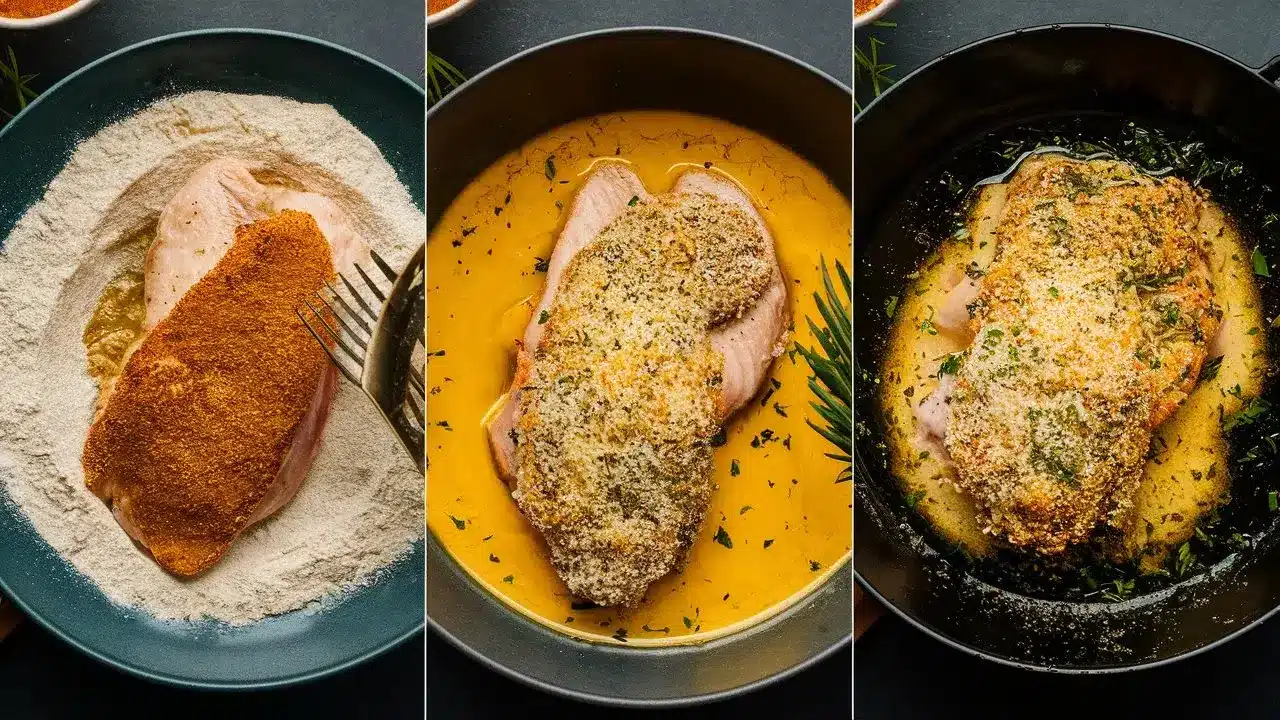
Breading is more than just a coating—it’s the crunchy, flavorful outer layer that gives chicken cutlets their irresistible texture. Typically, breading involves three main components: flour, egg wash, and breadcrumbs.
Each plays a crucial role in creating that golden-brown crust. But, as simple as it sounds, getting these components to work together harmoniously is key to preventing breading from slipping off.
The process starts with flour, which acts as the base. The flour sticks to the chicken and helps the egg wash adhere better. Next comes the egg wash, a mixture of beaten eggs and sometimes a splash of milk or water.
This not only adds moisture but also acts as the glue that holds the breadcrumbs in place. Finally, breadcrumbs provide the desired crunch. Whether you opt for traditional, seasoned, or panko breadcrumbs, each will add a unique texture to your chicken cutlet.
But why does breading sometimes fail to stick? It often comes down to moisture and technique. If the chicken is too wet or if the breading station isn’t set up correctly, you’ll likely encounter problems.
By understanding these basics, you can take the first step toward mastering the art of breading.
The Science Behind Breading Adherence
Breading chicken cutlets isn’t just an art; it’s a science. Moisture control is crucial in this process. When the chicken is too wet, the flour doesn’t stick properly, which then causes the egg wash and breadcrumbs to slide off during cooking. Conversely, if the chicken is too dry, the breading can turn out uneven or patchy.
So, how do you get it just right? This simple step can make a huge difference in how well the breading sticks. Additionally, setting up a well-organized breading station can streamline the process and reduce the chances of breading falling off.
Arrange your ingredients in a logical sequence—flour first, followed by egg wash, and then breadcrumbs. This order ensures that each layer of breading adheres properly to the chicken.
Another key factor is letting the breaded chicken rest before cooking. After coating the chicken in flour, egg, and breadcrumbs, place it on a wire rack and refrigerate it for at least 30 minutes. This rest period helps the breading set, making it less likely to come off during frying or baking.
Now that you have a solid understanding of what breading is and how it works, you’re ready to dive into the next section, where we’ll provide a detailed, step-by-step guide to achieving perfectly breaded chicken cutlets every time.
Step-by-Step Guide to Perfect Breading
Now that you understand the basics of breading, it’s time to roll up your sleeves and get into the nitty-gritty of making sure that breading sticks to your chicken cutlets like a charm.
Now that you’ve mastered the art of making crispy chicken cutlets, you might be wondering what to serve alongside them. Explore the best side dishes to pair with your chicken cutlets to complete your meal.
In this section, we’ll walk you through each step, from preparing your chicken to setting up a foolproof breading station.
Preparation of Chicken Cutlets
Preparation is everything, especially when it comes to breading chicken cutlets. The first step is ensuring your chicken cutlets are properly prepped. Start by trimming any excess fat or uneven edges. This not only makes for a neater cutlet but also helps the breading adhere more evenly.
After trimming, the next crucial step is drying your chicken. Moisture is the enemy of breading. Use paper towels to pat each cutlet dry. The drier the surface, the better the flour will stick, setting the stage for flawless breading.
Next, let’s talk seasoning. While the breading itself will add flavor, seasoning the chicken directly enhances the taste from the inside out.
Setting Up the Breading Station
Now that your chicken is prepped, it’s time to set up your breading station. This is where the magic happens, and having everything organized is key to a smooth process.
Step 1: Flour
Start with a shallow dish of all-purpose flour. Season the flour with a bit of salt and pepper—this adds an extra layer of flavor. The flour is your first line of defense, creating a dry surface that helps the egg wash cling to the chicken. Be sure to coat the chicken evenly, shaking off any excess flour to avoid clumps.
Step 2: Egg Wash
Next comes the egg wash. In another shallow dish, beat a couple of eggs and add a splash of milk or water. The egg wash is the glue that holds the breadcrumbs in place. Ensure each piece of chicken is fully submerged, allowing the excess egg to drip off before moving on to the next step.
Step 3: Breadcrumbs
Finally, the breadcrumbs. Whether you opt for traditional breadcrumbs, seasoned varieties, or the extra crunch of panko, this is where the texture is built. Press the chicken cutlets into the breadcrumbs, ensuring every inch is covered. Don’t be afraid to apply a bit of pressure here; this helps the breadcrumbs adhere firmly to the egg wash.
Pro Tip: Double Coating for Extra Crunch
If you want an extra crispy and thick crust, try double coating. After the first breadcrumb layer, dip the cutlet back into the egg wash and then press it into the breadcrumbs again. This adds an extra layer of crunch that’s particularly satisfying.
Cooking Techniques to Prevent Breading Loss
You’ve done all the hard work prepping and breading your chicken cutlets, and now it’s time to cook them to perfection. But here’s where things can go awry if you’re not careful. The breading can easily fall off during cooking if you don’t pay attention to a few key details. In this part, we’ll cover the best techniques for frying, baking, and even air-frying your chicken cutlets to ensure that breading stays intact and turns out crispy and delicious.
Choosing the Right Cooking Method
The method you choose to cook your chicken cutlets can make a big difference in how well the breading adheres. Whether you’re frying, baking, or air-frying, each technique has its own set of best practices to ensure a crunchy, flavorful coating.
Frying: The Classic Method
Frying is arguably the most popular method for cooking breaded chicken cutlets. It yields the crispiest results, but it requires some finesse. The most crucial element in frying is oil temperature. Too hot, and the breading burns before the chicken is cooked through; too cool, and the breading absorbs too much oil and becomes soggy.
- Oil Temperature: Heat the oil to about 325°F to 350°F. Use a thermometer to maintain this range. If the oil is too cool, the breading will absorb excess oil, leading to a greasy, unappealing crust.
- Pan Size and Crowding: Another key to success is using the right pan size and avoiding overcrowding. Cook the cutlets in batches, leaving space between each piece. Overcrowding lowers the oil temperature, leading to uneven cooking and soggy breading.
Baking: A Healthier Alternative
If you prefer a lighter option, baking your chicken cutlets can also yield a crispy result, especially when done right. The key to baking is ensuring that the cutlets don’t sit directly on the baking sheet, which can cause the bottom to become soggy.
- Preheat the Oven: Make sure your oven is fully preheated to 400°F before placing the cutlets inside. This high temperature helps to quickly crisp up the breading, sealing in the juices of the chicken.
Air-Frying: The Modern Method
Air-frying is another great option, especially if you’re looking for a quicker and healthier way to cook your breaded chicken cutlets. The air fryer uses hot air circulation to create a crispy exterior without the need for a lot of oil.
- Preheat the Air Fryer: Just like with baking, preheating the air fryer to around 375°F ensures that the cutlets start cooking immediately when they hit the basket, promoting a crispy crust.
Make Chicken Cutlets Without Breading Falling Off: Common Mistakes
Even with the best intentions, a few common mistakes can cause your breading to fall off those perfectly prepped chicken cutlets. Understanding these pitfalls is crucial to ensuring that your breading stays intact, resulting in crispy, flavorful chicken every time. Let’s dive into the most frequent errors and how you can easily avoid them.
Top Reasons Breading Falls Off
1. Excess Moisture
One of the biggest culprits behind failed breading is moisture. When chicken cutlets are too wet, the flour, egg, and breadcrumb layers can’t properly adhere, causing the breading to slide off during cooking. This issue is often overlooked but is easily preventable.
- Solution: Before you even think about breading, make sure your chicken cutlets are as dry as possible. Use paper towels to pat the chicken dry thoroughly. If you have time, you can also let the cutlets air-dry in the refrigerator for about 30 minutes before breading. This step reduces excess moisture and creates a better surface for the flour to stick to.
2. Skipping the Resting Period
It’s tempting to start cooking immediately after breading, but skipping the resting period is a mistake that can lead to breading disasters. The resting period allows the breading to set and adhere firmly to the chicken, reducing the chances of it falling off during cooking.
- Solution: After breading your chicken cutlets, place them on a wire rack and let them rest in the refrigerator for at least 30 minutes. This short rest helps the breading bond to the chicken, making it less likely to separate during frying, baking, or air-frying.
3. Overcrowding the Pan
When you’re frying chicken cutlets, it’s easy to overcrowd the pan, especially if you’re in a rush. However, this can cause the oil temperature to drop, leading to uneven cooking and soggy breading that’s prone to falling off.
- Solution: Fry your chicken cutlets in batches, leaving enough space between each piece. This ensures that the oil temperature remains consistent, allowing the breading to cook evenly and stay crispy. If you’re baking or air-frying, the same principle applies—avoid overcrowding to ensure even heat distribution.
4. Improper Coating Technique
The breading process may seem straightforward, but rushing through it or using improper techniques can lead to subpar results. For instance, not shaking off excess flour or egg wash can create clumps, making the breading uneven and more likely to fall off.
- Solution: Take your time with each step of the breading process. After dredging the chicken in flour, shake off any excess to prevent clumping. The same goes for the egg wash—let the excess drip off before moving on to the breadcrumbs. Ensuring even coating at each stage is key to a flawless crust.
Make Chicken Cutlets Without Breading Falling Off (FAQs)
As we’ve journeyed through the intricacies of breading chicken cutlets, you might still have some lingering questions. This section is dedicated to addressing the most common queries that cooks have when it comes to mastering the art of breading. Whether you’re a seasoned pro or a kitchen novice, these tips will help you troubleshoot and perfect your technique.
Why Does My Breading Always Fall Off?
This is the number one question when it comes to breading chicken cutlets, and it usually comes down to a few key factors. The most common reason is moisture—if your chicken isn’t dry enough, the breading won’t stick properly. Another culprit could be skipping the resting period after breading, which helps the coating set. Lastly, overcrowding your pan or cooking at the wrong temperature can also cause the breading to detach.
Quick Tips:
- Pat the chicken dry with paper towels before breading.
- Let the breaded chicken rest in the refrigerator for at least 30 minutes before cooking.
- Avoid overcrowding the pan, and ensure the oil or oven is at the correct temperature.
Can I Use Different Types of Breadcrumbs?
Absolutely! The type of breadcrumbs you use can greatly influence the texture and flavor of your chicken cutlets. Traditional breadcrumbs offer a classic, even coating, while panko breadcrumbs provide an extra crispy, airy texture. You can also experiment with seasoned breadcrumbs for added flavor, or even crushed cereal or crackers for a unique twist.
Quick Tips:
- For a lighter, crunchier texture, opt for panko breadcrumbs.
- Seasoned breadcrumbs can add an extra layer of flavor, but be mindful of salt content if you’ve already seasoned your chicken.
What’s the Best Way to Cook Breaded Chicken Cutlets?
The best method depends on your preference for texture and health considerations. Frying is the traditional method, offering the crispiest result, but it’s also higher in calories. Baking is a healthier alternative that still delivers a satisfying crunch, especially when using a wire rack. Air-frying is a modern method that strikes a balance between the two, using less oil while still achieving a crispy exterior.
Quick Tips:
- Fry at 325°F to 350°F for golden, crispy results.
- Bake at 400°F on a wire rack to avoid soggy bottoms.
- Air-fry at 375°F for a healthy, crispy alternative.
How Can I Store and Reheat Breaded Chicken Cutlets?
Storing and reheating breaded chicken cutlets without losing their crispiness can be tricky, but it’s definitely possible.
For storage, allow the cutlets to cool completely before placing them in an airtight container in the refrigerator. When it’s time to reheat, avoid the microwave as it tends to make the breading soggy. Instead, use an oven or air fryer to bring back that crispy texture.
Quick Tips:
- Store in an airtight container to keep moisture out.
- Reheat in an oven or air fryer at 350°F until warmed through to restore crispiness.
With these answers in hand, you should be well-prepared to tackle any breading challenges that come your way. Whether you’re troubleshooting an issue or just looking to refine your technique, these tips will help you achieve the perfect breaded chicken cutlets every time.